 | From: Informed Democracy Whether it is Spring or Fall, it is easy and fascinating to plant pumpkin seeds indoors and watch them sprout into seedlings. It takes 8-10 days for a pumpkin seed to become a young plant. For most of that time, the seed is growing down and producing roots. On about the 7th day, two fat, fuzzy, oval baby leaves break through the soil. Within a few more days, a third leaf, with wrinkles and jagged edges, appears in the center of the young plant. Here's what you will need to make a root view chamber. |
| MATERIALS: (1) Potting soil (2) Pumpkin seeds (3) Half gallon milk carton (4) acetate (overhead transparency) or clear plastic (5) Waterproof glue (6) Wooden block or book. | ||
| DIRECTIONS: 1. Cut off top of milk carton; rinse the carton with soap and water. 2. Cut a "window" flap on one side of the milk carton, leaving flap attached at the bottom. The flap should be about half an inch in from the edges of the container. Leave the flap attached at the bottom so the roots can be covered when not observed. 3. Cut acetate or plastic for a "window". Place inside carton and glue. 4. Loosely pack moist potting soil to one inch below the top of the "window". Plant one seed, flat side against the top center of the "window" about 1" deep. | ||
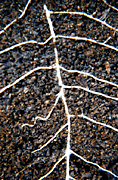 5.Place a 1" block or book under the back bottom edge of the milk carton so the "window" tips toward the ground. This encourages the roots to grow close to the window for easy viewing. 5.Place a 1" block or book under the back bottom edge of the milk carton so the "window" tips toward the ground. This encourages the roots to grow close to the window for easy viewing. 6. Keep "window" flap closed except when viewing roots. Check soil each day, making sure it is moist but not soaking. When the seed sprouts and grows above the soil, keep container (but not roots) exposed to daylight. 7. Use a journal to record changes. Make a time-lapse drawing using a different colored pencil each day. | ||
No comments:
Post a Comment