Showing posts with label Fine Motor. Show all posts
Showing posts with label Fine Motor. Show all posts
Tuesday, November 25, 2014

Light Up Christmas Tree
From: All Kids Network


What you'll need:
What you'll need:
- Green Construction paper
- Single hole punch (the larger the size of the hole the better)
- Multiple colors of tissue paper
- Scissors
- Glue stick
- Christmas Tree template
- Print our Christmas tree template and cut it out. Trace it onto green construction paper and cut the tree out.
- Punch holes on the tree using your hole punch. Our hole punch is a bit smaller than I would have liked (hopefully Santa will bring a better one this Christmas!), but it still worked pretty well.
- Cut strips of different colored tissue paper, and then cut the strips into small squares. You want the squares to be big enough to cover one of the punched holes. This is a great step to let your preschooler practice their scissor skills.
- Cover the back of the tree with glue (a glue stick is the best way to avoid a mess).
- Have your child stick the tissue paper squares over the holes on the back of the tree.
- After it dries (so you don’t accidentally glue your tree to the window), hang your tree on the window. When the sun shines through the "lights" will glow!
Saturday, September 27, 2014

Sunday, September 14, 2014
Apple Seed Predictions
Guess My Seeds
Idea from: Everything Preschool
Clip art: KPM Doodles
I heavily altered this idea, but the original idea came from the Everything Preschool website.
After talking about the growth of an apple tree: seed-tree-apple-back to seed; and the parts of an apple: stem, skin, flesh, core, pips (seeds), show the students an apple and let them guess the number of seeds
in it.
Record predictions on a chart, if desired.
Then carefully cut the apple open (cross-wise if you want to find the star in the middle) and count how many seeds are inside. Whose predictions were closest?
So you don't waste the apple you can have apple slices for snack.
For hands on fun: After cutting the apple in half, give each student a half and a spoon and allow them to dig the seeds out themselves.
Other ideas you could add in:
-Concepts of half/whole
-Function of each part of the apple (stem holds apples on the tree; skin and flesh for eating and protecting the seeds; seeds for growing new trees)

Idea from: Everything Preschool
Clip art: KPM Doodles
I heavily altered this idea, but the original idea came from the Everything Preschool website.
Record predictions on a chart, if desired.
Then carefully cut the apple open (cross-wise if you want to find the star in the middle) and count how many seeds are inside. Whose predictions were closest?
So you don't waste the apple you can have apple slices for snack.
For hands on fun: After cutting the apple in half, give each student a half and a spoon and allow them to dig the seeds out themselves.
Other ideas you could add in:
-Concepts of half/whole
-Function of each part of the apple (stem holds apples on the tree; skin and flesh for eating and protecting the seeds; seeds for growing new trees)
Tuesday, July 8, 2014

Thursday, January 9, 2014


Saturday, October 12, 2013
Exploding Chain
From Frugal Fun For Boys:
Did you know that you can build an exploding chain reaction by weaving together popsicle sticks or craft sticks? I saw this post on Pinterest from Mom Trusted, and I knew that the boys would want to try this!
 The chain stays together as long as you hold down the end that you are building onto. Release the end and…
 There is a video of our chain reaction in action at the end of the post!
The post on Mom Trusted said that the chain was pretty easy to build. We found that it was actually kind of tricky to get started. I didn’t want to be defeated by this silly project, so I was determined to get it right! We put it aside for awhile, and when we came back to it, Aidan and I figured out the chain right away. Getting started is the hard part – once you master than, the chain is not so bad.
Here’s how to build one:
We found that wide craft sticks work better than the skinny sticks.
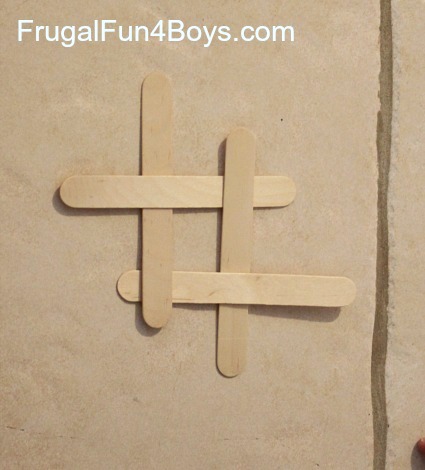
Step 1: Arrange 4 craft sticks into this pattern. Make them look exactly like this.
 Step 2: Add another stick to the top to secure the
end. This stick must go diagonally across to hold down the ends of the
top horizontal stick and the right vertical stick. If it won’t hold
them both down, slide those two sticks out farther until they are
successfully held down by the stick you added.
Step 2: Add another stick to the top to secure the
end. This stick must go diagonally across to hold down the ends of the
top horizontal stick and the right vertical stick. If it won’t hold
them both down, slide those two sticks out farther until they are
successfully held down by the stick you added.
This next photo also shows the first chain stick added.
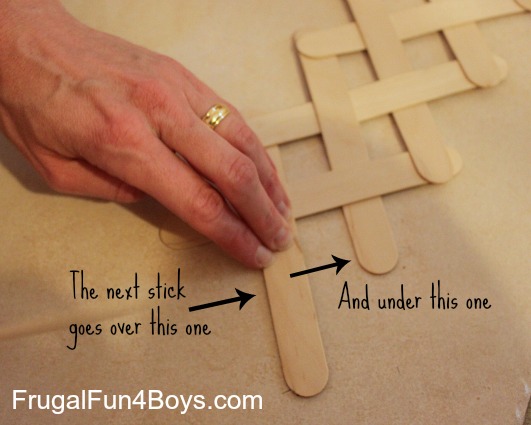
 Step 3: Build the chain by adding craft sticks, one at a time to each side. Each stick should go over one stick, and under one stick.

Build a Chain Reaction with Popsicle or Craft Sticks
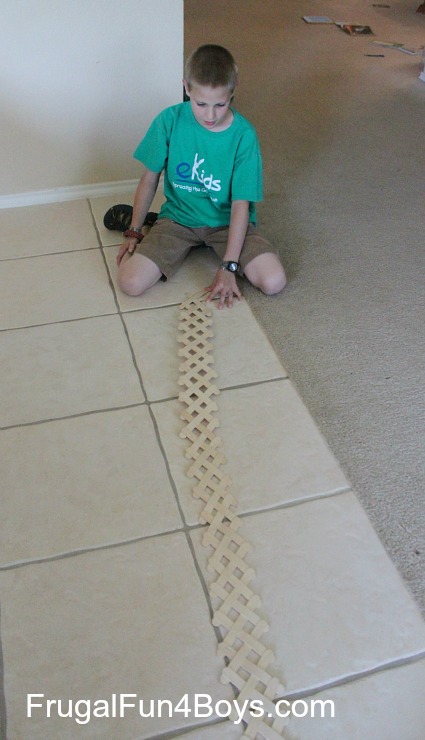

The post on Mom Trusted said that the chain was pretty easy to build. We found that it was actually kind of tricky to get started. I didn’t want to be defeated by this silly project, so I was determined to get it right! We put it aside for awhile, and when we came back to it, Aidan and I figured out the chain right away. Getting started is the hard part – once you master than, the chain is not so bad.
Here’s how to build one:
We found that wide craft sticks work better than the skinny sticks.
Step 1: Arrange 4 craft sticks into this pattern. Make them look exactly like this.
This next photo also shows the first chain stick added.

If a video would help, you can check out the post at Mom Trusted.
They have a great instructional video posted as well as a video of
some kids who built a chain reaction with 1,000 sticks! That one is
totally worth watching.
Thursday, October 10, 2013
Monster Ideas
From PreKinders:
Play the song “The Mice Go Marching” from Hap Palmer’s album “Rhythms on Parade”. Children will tiptoe during the “mice” part and stomp during the “monster” part.


Add wiggle eyes to the play dough (mixed in) and have the children pull out the “monster eyes”.

Children use several collage materials of their choice from our art center to create a monster mask on a paper plate.

Before reading Bugs That Go Bump in the Night, remove the surprise from the envelope at the end of the book. At the end, show children the empty envelope and ask them to make something scary to put inside.

Fold a piece of brown construction paper (hamburger fold). On the inside, staple or glue a half-sheet of white drawing paper to the right side. On the front, write “There’s a Nightmare in My Closet”. Have the children draw a nightmare on the white paper on the inside of the “closet”. At large group, my students often like to talk about their nightmares and things that scare them. I think they like to get it out “in the open” and hear what other children have to say about their nightmares.

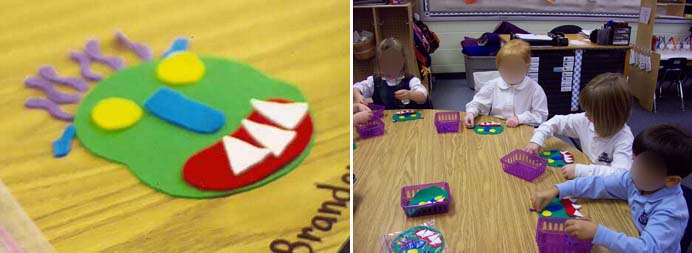
I made a set of “Big Green Monsters” for the children to use in small groups. I traced the pages of the book, Go Away Big Green Monster, to make patterns for cutting out the pieces from felt. As the story is read, the children add each piece of the monster’s face, then take them away. I also have the children retell the story as they manipulate the pieces.

Read the blog post: Slime Science
Monster Activities
Monster Song
[Music]Play the song “The Mice Go Marching” from Hap Palmer’s album “Rhythms on Parade”. Children will tiptoe during the “mice” part and stomp during the “monster” part.
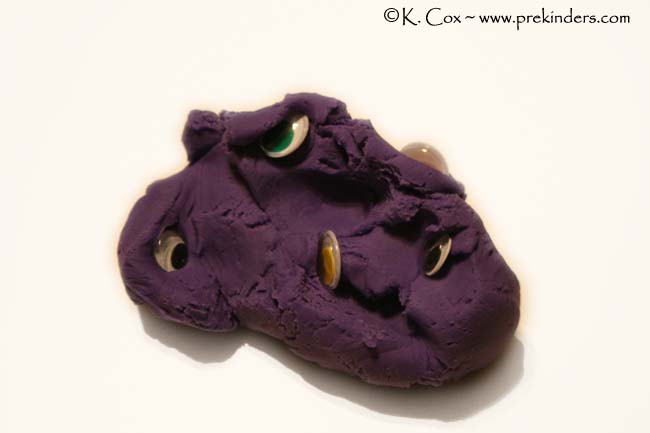
Monster Eyes
[Fine Motor]Add wiggle eyes to the play dough (mixed in) and have the children pull out the “monster eyes”.
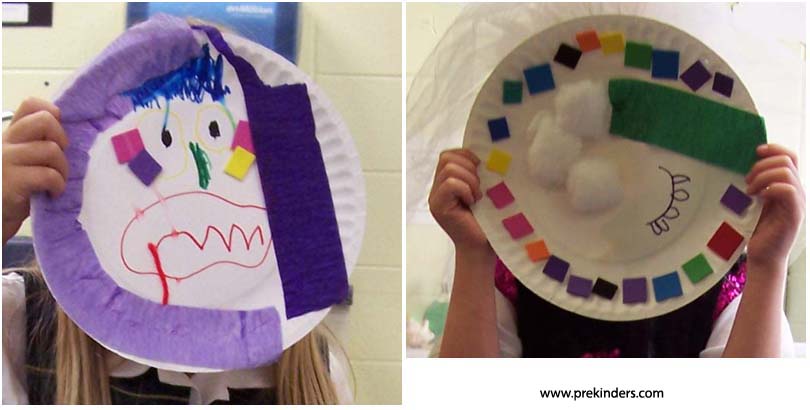
Monster Masks
[Art]Children use several collage materials of their choice from our art center to create a monster mask on a paper plate.
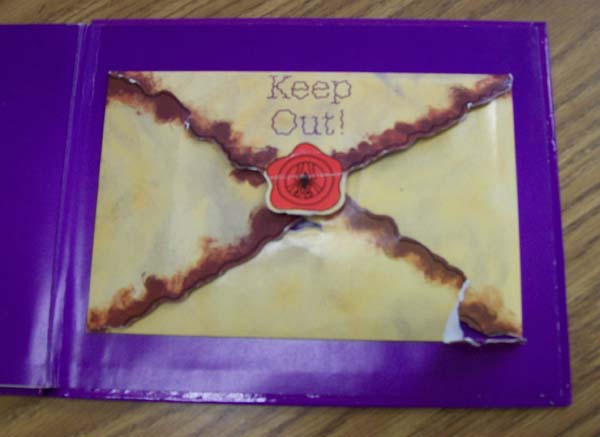
Bugs That Go Bump in the Night
[Art]Before reading Bugs That Go Bump in the Night, remove the surprise from the envelope at the end of the book. At the end, show children the empty envelope and ask them to make something scary to put inside.
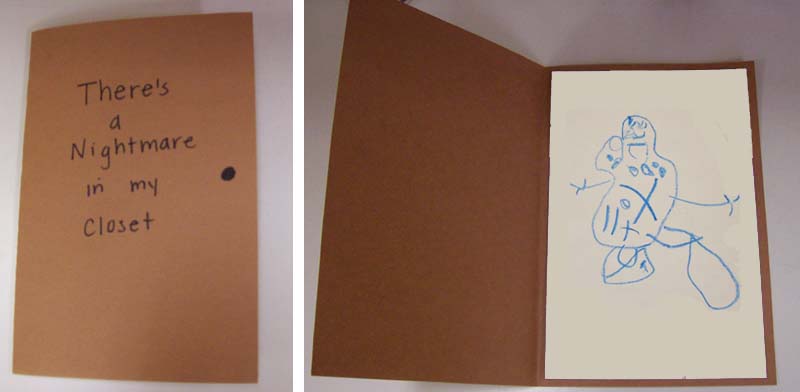
There’s a Nightmare in My Closet
[Art]Fold a piece of brown construction paper (hamburger fold). On the inside, staple or glue a half-sheet of white drawing paper to the right side. On the front, write “There’s a Nightmare in My Closet”. Have the children draw a nightmare on the white paper on the inside of the “closet”. At large group, my students often like to talk about their nightmares and things that scare them. I think they like to get it out “in the open” and hear what other children have to say about their nightmares.
Go Away Big Green Monster
[Literacy]I made a set of “Big Green Monsters” for the children to use in small groups. I traced the pages of the book, Go Away Big Green Monster, to make patterns for cutting out the pieces from felt. As the story is read, the children add each piece of the monster’s face, then take them away. I also have the children retell the story as they manipulate the pieces.
Slime
[Science]Read the blog post: Slime Science
Sunday, September 29, 2013
Exploring Pumpkins
From: PreKinders


We had several pumpkins of different sizes and colors for the children to observe, touch, and make observational drawings. After several weeks, these were cut in half for the children to observe the inside. Tweezers were placed in the science center with the pumpkins for children to pick out the seeds.
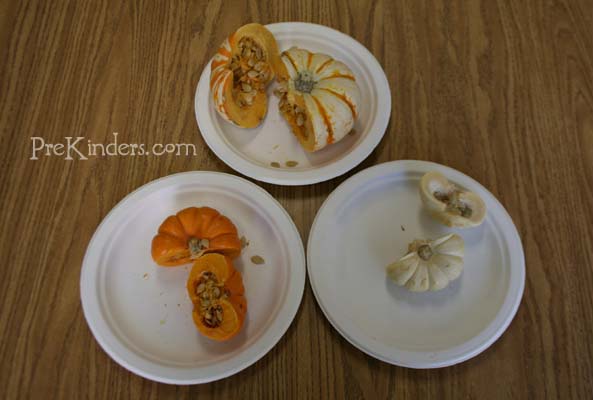

We had several pumpkins of different sizes and colors for the children to observe, touch, and make observational drawings. After several weeks, these were cut in half for the children to observe the inside. Tweezers were placed in the science center with the pumpkins for children to pick out the seeds.
Sunday, September 22, 2013
Toothpick Punch - Fall Edition
From PreKinders:


To do this activity, cut squares of construction paper (I cut mine
6×6 inches). Draw a simple pumpkin or leaf shape with a Sharpie.
I placed a stack of these papers in the fine motor center, along with toothpicks and a carpet square. Children place the paper on the carpet square and use the toothpick to punch holes all along the black lines. When they are done, they can hold their paper up to the light and see the light shining through the holes.
Kids enjoy it and it’s great fine motor practice!
Toothpick Punch with Pumpkin
Toothpick Punch with Leaf
I placed a stack of these papers in the fine motor center, along with toothpicks and a carpet square. Children place the paper on the carpet square and use the toothpick to punch holes all along the black lines. When they are done, they can hold their paper up to the light and see the light shining through the holes.
Kids enjoy it and it’s great fine motor practice!
Paper Towel Art - Fall Edition
From PreKinders:

To do this activity, draw a pumpkin or leaf shape on a plain white
paper towel using a permanent black marker, like a Sharpie. It must be
permanent ink, not a regular black marker. I just free-handed the shapes
when I drew them. Use liquid watercolor (mine is Colorations from
Discount School Supply), or food color. Pour the watercolor into a paint
palette or small dish. Children will use medicine droppers to squeeze
drops of watercolor onto the paper towel.
The watercolor will spread outside of the outline, but that’s okay. The point is to have fun while exercising the fine motor muscles.
Tip: place paper underneath the paper towel to soak up the extra watercolor because it will bleed through onto the table.
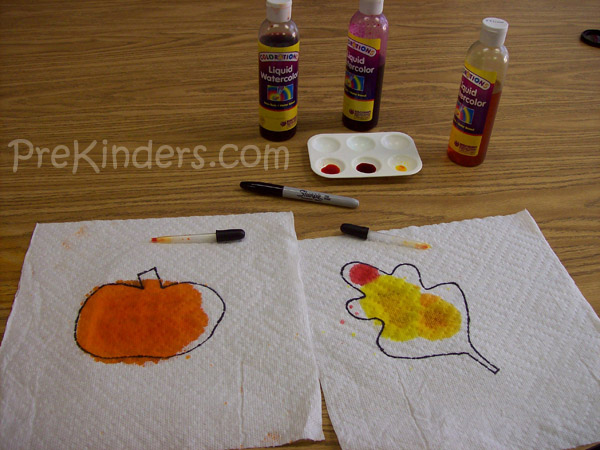
Paper Towel Art
The watercolor will spread outside of the outline, but that’s okay. The point is to have fun while exercising the fine motor muscles.
Tip: place paper underneath the paper towel to soak up the extra watercolor because it will bleed through onto the table.
Thursday, March 14, 2013
Even more task boxes...
From Playing House:

For this one, I want the students to write the number on the card after placing the animals on the dots.

The kids love opening and closing things...even in preschool. I'm going to put in things whose names have their target speech sounds.

For this one, I want the students to write the number on the card after placing the animals on the dots.
The kids love opening and closing things...even in preschool. I'm going to put in things whose names have their target speech sounds.
Wednesday, March 13, 2013
More Task Box Ideas...
From TEACCH:

I hate the box, but love, love, love the idea.

From Autism Teaching Tools:
I want to use faces that are depicting different feelings so that I can ask the student how the person is feeling.


From Considerate Classroom:


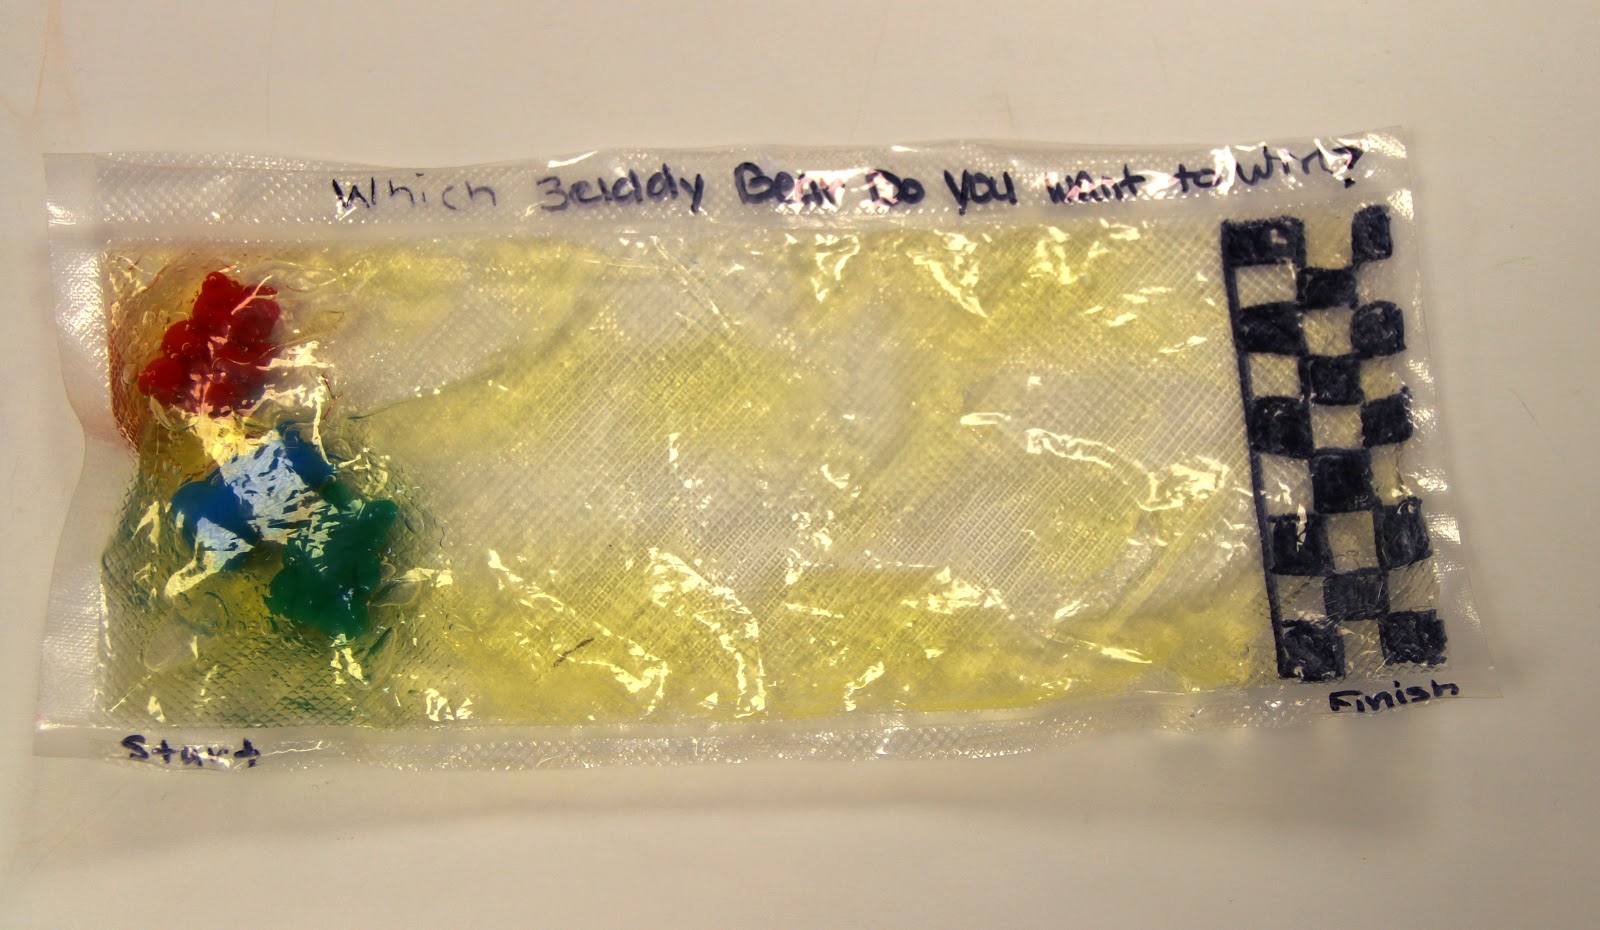


I hate the box, but love, love, love the idea.
From Autism Teaching Tools:
I want to use faces that are depicting different feelings so that I can ask the student how the person is feeling.
From Considerate Classroom:


Sunday, March 10, 2013
Straws
First, students will cut the straws into small pieces, at least an inch in length.
Then they can lace them with string or pipe cleaners or stick them into play dough to make pictures or write words.
Then they can lace them with string or pipe cleaners or stick them into play dough to make pictures or write words.
Button Ideas
From Child Care Land:
Popcorn and Buttons:
Fill a tub with popcorn seeds and add buttons. Using fingers or tweezers, students pick the buttons
out and sort them into cups.

Button Counting:
Using a picture of a snowman found here, students count out the appropriate number of buttons.

Buttoning Practice:
Make these cute little squares with a button sewn in the middle. Student buttons on or unbuttons
off the circle.

Button Play Dough:
Make play dough. Fold buttons in. Students take out as many as they can.

From Motherhood On a Dime:

Popcorn and Buttons:
Fill a tub with popcorn seeds and add buttons. Using fingers or tweezers, students pick the buttons
out and sort them into cups.

Button Counting:
Using a picture of a snowman found here, students count out the appropriate number of buttons.
Buttoning Practice:
Make these cute little squares with a button sewn in the middle. Student buttons on or unbuttons
off the circle.

Button Play Dough:
Make play dough. Fold buttons in. Students take out as many as they can.

From Motherhood On a Dime:


Learning Links
From Child Care Land:
I found some of these in my classroom the other day and almost threw them away. When played with independently, my students make chains and then swing them around like lassos. However, I'm now glad I didn't. I'm going to use them to make these:
Learning Links number matching: Cards with numbers on them (can make them themed) or number
words or dots etc. Punch a small hole near the bottom middle of the card. Students place the
appropriate amount of links to the card.

Learning Links patterning: Take pictures of pre-chained pattern links. Ask students to recreate.
Learning Links color sorting: Create link chains of each color.
Matching upper- and lowercase letters.

Alphabet and Number order: Alphabet or number cards with holes on each side. Students link them
together using the links.

I found some of these in my classroom the other day and almost threw them away. When played with independently, my students make chains and then swing them around like lassos. However, I'm now glad I didn't. I'm going to use them to make these:
Learning Links number matching: Cards with numbers on them (can make them themed) or number
words or dots etc. Punch a small hole near the bottom middle of the card. Students place the
appropriate amount of links to the card.

Learning Links patterning: Take pictures of pre-chained pattern links. Ask students to recreate.
Learning Links color sorting: Create link chains of each color.
Matching upper- and lowercase letters.

Alphabet and Number order: Alphabet or number cards with holes on each side. Students link them
together using the links.
Subscribe to:
Posts (Atom)