Lesson Planning with Me

Hello! I teach an integrated preschool classroom, which means I am responsible for students ages three to five with special needs of all types as well as typical developing students. My students range in ability from a toddler to a typical kindergartener. Therefore, my activities must be able to reach a wide range and be easily adjusted for multiple ability levels.

I created this blog as a way to keep track of the fantastic ideas I have gathered over the years. Because I just randomly add activities to the blog, use the search, standard list, or theme list on the left side to find the activities you are after!

I also create and sell resources that can be found at TeachersPayTeachers and Teacher's Notebook.

Friday, April 6, 2012

Match Letters to Words (animals)

From: Pre-K Pages

Setting: Small Group, Literacy Centers

Objectives: Sight words or animal names

Materials: Carson Dellosa Barn notepad, Sharpie marker, lamination film, magnetic letters

Instructions: Write a different focus sight word on each page of the barn note pad with a Sharpie marker. Laminate the note pad pages for durability. Place a basket or tub of magnetic letters in the center of the table. Students will spell the sight words out on the mats with magnetic letters.


Where is the Cow? booklet

From: Pre-K Pages

Cow Positional Words Book {FREE}
cow book

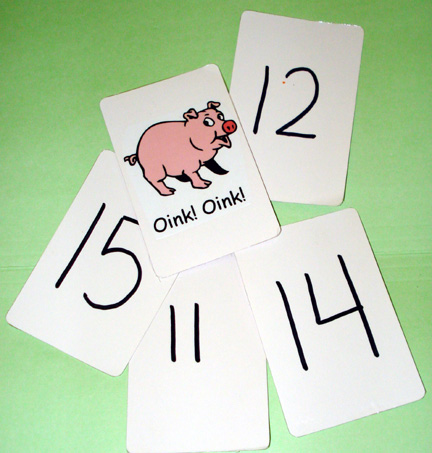
Oink Game

From: Pre-K Pages

farm oink
Setting: Small Group, Math Centers

Objectives: Number recognition

Materials: Blank cards- one per number and one extra, Sharpie marker, one pig clipart picture or sticker. (can add animals if desired)

Instructions: Write one number on each card with the Sharpie. Leave one card blank and glue a clipart picture of a pig or place a pig sticker on the card, write the words “Oink! Oink!” on that one card. Seat a small group of students around a table. Place the cards in a basket, tub, or container that can be easily held by the children. The students will take turns passing the container around the table and drawing one card with eyes closed. The student draws a card, identifies the number on the card, and passes the container to the next person, leaving his card on the table in front of him. When a student selects the card with the picture of the pig all the students at the table make pig noises. The student who drew the “Oink!” card then returns all his cards to the container.

Friday, December 30, 2011

Iceberg Treat

From: 2 Teaching Mommies

This week we are learning all about the Polar Lands!  One distinctive feature of the any polar area are the icebergs. 

IMG_7816
This “iceberg” dessert doesn’t require much and definitely isn’t as many calories as our “snowball” treat. Although it may be just as sweet.  Just make sure you allow enough time for Jell-O to set.
IMG_7798
Here is what you’ll need: 
  • 1 box instant blue Jell-O
  • whip cream
  • water
  • cups to set Jell-O in for each person
Serves 4
To make this “Iceberg” dessert, just follow these easy steps:
Step 1:
Step 2:
IMG_7800 IMG_7802
Boil a cup of water and add it to your Jell-O powder mix.
Stir until dissolved.
Step 3:
Step 4:
IMG_7803 IMG_7809
Add a cup of cold water.
Pour mixture into individual clear (plastic or glass) cups.  Then refrigerate, until set. This will be your ocean.
Step 5:
Step 6:
IMG_7832 IMG_7829
Then have your kiddo add a little bit of whip cream to the top to create your iceberg.
EAT and ENJOY!

Thursday, December 8, 2011

Snowman Soup

From: DLTK

This is a really simple stocking stuffer to make.   If you go the extra mile of making a snowman mug to go with it, you end up with a really sophisticated gift that a child could do, but even a grownup would be proud to give.

Instructions:

Arrange the following ingredients in a small gift bag or basket or in your home made snowman mug:
  • 1 individual pack hot chocolate mix (or enough scoops of mix to make a cup)
  • 2 Hershey's chocolate kisses (eyes)
  • 4 chocolate chips (mouth)
  • 5-10 mini-marshmallows
  • 1 small candy cane or cinnamon stick
Print the gift tag to go with the gift.

Christmas Shape Sort

Shape Sort:  Divide a file folder into 4 columns and place a die-cut rectangle, circle, square, and triangle at the top of each column.  Provide students with picture cards of Christmas items to sort into the appropriate column.
Circle - cookie, wreath, candy. lollipop, ball, ball ornament
Square - different types of gift boxes, block, cookie
Rectangle - different types of gift boxes, cookie
Triangle - Christmas tree, cookie

Thursday, November 17, 2011

Sharing Salad


Ingredients: brown sugar cones or waffle cones, raisins, Cheerios, grapes, apples, bananas, Chex cereal *optional* strawberry yogurt*.

Directions: Cut the apples and bananas into bite size pieces. Mix the Cheerios, Chex, raisins, and fruit in bowl. Have the children come to you in small groups and help you stir the “Sharing Salad”. Put a scoop of the salad into each “cornucopia” (cone) and place on a plate. If you think your students won’t eat the salad you might want to try mixing it with strawberry yogurt first. I have found that most of my students will eat it if the fruit is covered in strawberry yogurt. If your students are able to bring the ingredients for the salad it is even more meaningful. We use this activity in place of the more traditional and controversial Thanksgiving Feast.

Sunday, November 6, 2011

I Know an Old Lady Who Swallowed a Pie


Setting: Small Group, Literacy Centers

Objective: Oral language, storytelling, sequencing

Book: I Know an Old Lady Who Swallowed a Pie

Materials: blackline master of Old Lady Who Swallowed a Pie, construction paper, blackline master of foods the Old Lady eats in the story, crayons or markers, X-acto knife, tape, Pringles can.

Directions: Tape a piece of construction around a Pringles can. Copy, color, and cut out a blackline master of the Old Lady from the story. Attach the old lady to the can with tape. Use the X-acto knife to cut a hole through the blackline and the can where the Old Lady’s mouth is. Next, copy and color the pictures of the food the Old Lady eats in the story. Cut the pictures out and have students re-tell the story by “feeding” the old lady the pictures through the hole in her mouth.

Feed the Turkey


Setting: Small Group, Math Centers

Objective: Number Sense

Materials: empty Pringles cans, tape, brown construction paper, Sharpie marker, X-acto knife, colored construction paper for feathers, scissors, glue stick, unpopped popcorn kernels.

Directions: Cover each Pringles can with brown paper and secure with tape. Cut turkey bodies from the brown paper and attach to the front of each Pringles can with tape. Cut feathers from the colored construction paper and attach to the back of each turkey with glue stick or tape. Cut through the turkey’s mouth and can using the X-acto knife. Write one number on each turkey with a Sharpie. Place the un-popped popcorn in a pie pan or bowl. Place the Pringles can turkeys and the pan of popcorn at a table and have students count the correct number of kernels into each turkey’s mouth.

Feed the Turkey


Setting: Small Group, Literacy Centers

Objective: Alphabet Recognition

Materials: Turkey Beanie, magnet, glue (hot or E6000), magnet, magnetic letters, recording sheet (not pictured), Do-A-Dot markers.

Directions: Glue a magnet to the turkey’s nose using a glue gun, E6000, or similar. Give each child a recording sheet with the alphabet on it. Next, place the magnetic letters in the middle of the table, you could use a bowl or plastic container to hold them. Students will take turns holding the turkey and helping him “eat” the magnetic letters as pictured at left. When the turkey “eats” a letter the students may locate it on their recording sheet and mark it with a Do-A-Dot marker. You can find the upper and lowercase turkey alphabet recording sheets in the Thanksgiving Literacy Packet located in the printables section below.

Saturday, November 5, 2011

Comparing Numbers


For comparing numbers to 10 I give kids individual number cards and they build their number with unifix cubes and compare their tower to the partner next to them. They have to say something like "I have 6 cubes and David has 2. My tower is bigger. My number is more." David might say, "My number is less." This builds their academic vocabulary and is great "math talk."

Number Knowledge


Sunday, October 23, 2011

Monday, October 17, 2011

Dinosaurs!

Creating lap books, or folders like this one, gives your children or students a chance to play with the activities over and over again.  Also, when you send home activities, parents get the opportunity to not only see what you are doing in the classroom, but become better acquainted with the skills their children should have!

The activities that are found in this dinosaur folder can be found here.

However, I gathered my favorites below:

http://www.1plus1plus1equals1.com/Dinosaur_Train_ABC.pdf

http://www.1plus1plus1equals1.com/Dinosaur_Train_My_Name.pdf

http://www.1plus1plus1equals1.com/Dinosaur_Heads_and_Tails.pdf

http://www.1plus1plus1equals1.com/Dinosaur_Sizes_and_Puzzles.pdf

http://www.1plus1plus1equals1.com/Dinosaur_Counting.pdf

http://www.1plus1plus1equals1.com/Dinosaur_Puzzle.pdf